Accessibility and UDL: verify the learner experience
Check the real learner experience and remove barriers before sharing.
- Best for
- Every teacher
- Typical use
- 10-minute review pass
Search the guide
Type one or more words to search every chapter.
Universal Design for Learning is a planning approach, not a button or a collection of “special” versions. Start with a meaningful shared goal, anticipate barriers in the task and environment, and provide useful ways to engage with information and demonstrate learning. Then test what students will actually experience.
AlloFlow can help create accessible options, but it does not certify that a lesson, document, website, or activity meets a student's needs or a legal standard. Generated text, translations, images, audio, captions, interaction patterns, and exports require teacher review and, when appropriate, specialist testing.
Use the UDL design cycle
Begin with the goal
Separate the learning target from the method used to reach it.
- If the goal is to analyze an author's argument, listening to the source may be an appropriate way to access it.
- If the goal is to read grade-level text aloud with accuracy, replacing the reading with audio would change what is being assessed.
- If the goal is to explain a scientific relationship, a labeled model, oral explanation, or written response may all work if each can show the required reasoning.
Write what must remain constant and what can vary. This prevents a support from accidentally removing the skill students are meant to practice.
Anticipate barriers
Ask where the lesson depends unnecessarily on one kind of perception, language, movement, memory, timing, or social participation.
| UDL dimension | Planning question | Examples of flexible support |
|---|---|---|
| Engagement | How can students understand the purpose, enter the task, sustain effort, and ask for help? | Relevant choice, clear goal, predictable sequence, timer, progress cue, partner or independent route |
| Representation | How can students perceive and make meaning from the essential information? | Read-aloud, glossary, translation, visual model, captions, transcript, clarified layout, worked example |
| Action and expression | How can students navigate, practice, organize, and show the target? | Keyboard access, speech or typing, drawing with a text alternative, organizer, sentence frame, oral or written response |
Choice is not automatically accessible. Every offered option must work, and students need enough information to choose without becoming overwhelmed.
Observe and revise
After the lesson, ask which supports students selected, where they stopped, what still required teacher rescue, and whether each response mode revealed the intended learning. Use that evidence to improve the next version. Do not infer a disability, preference, or permanent “learning style” from one interaction.
Design a clear default path
An accessible lesson should work before a student opens optional tools.
Make the first action obvious
The opening screen or page should state:
- The learning goal.
- What to open or read first.
- What students will do with the information.
- What successful work includes.
- How to finish, submit, or get help.
Keep required content in the main reading and interaction order. Do not hide essential directions only in a tooltip, image, teacher speech, color cue, or optional audio.
Reduce navigation burden
Use a short sequence with consistent names. Mark optional supports by purpose, such as Listen, Vocabulary, Visual overview, or Planning organizer. Avoid sending students back and forth among many tools for one simple task.
When a lesson has several resources, include a checklist or numbered route. If students work asynchronously, add an explicit stopping point and a way to resume.
Keep language direct
Prefer short, concrete directions while preserving disciplinary vocabulary students need to learn. Define new terms in context. Break long procedures into steps and pair icons with text labels rather than relying on icons alone.
Plain language is not the same as lowered expectations. Students can reason about complex ideas through clear instructions.
Use built-in access supports purposefully
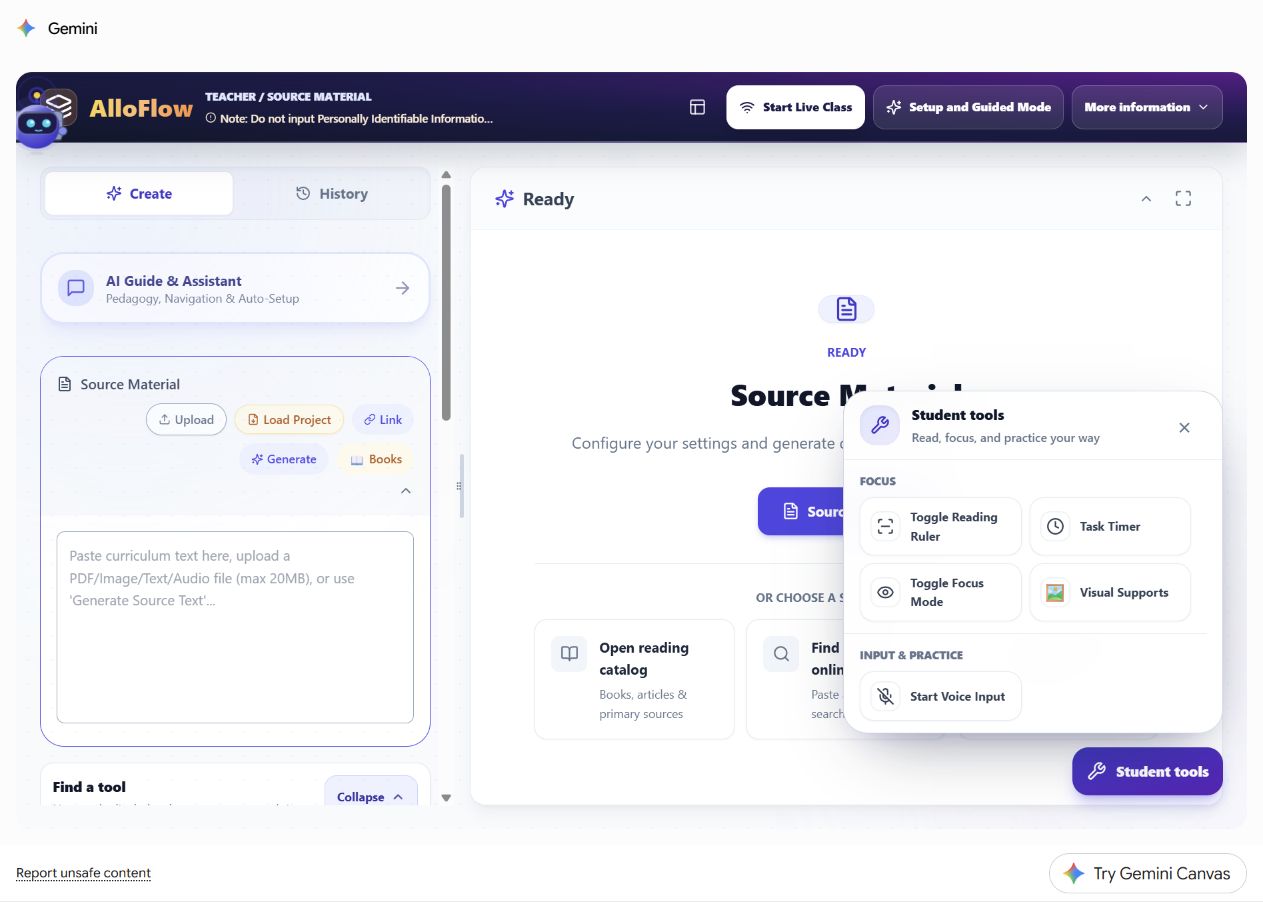
This is one view's set. Which supports appear depends on the view, the loaded modules, and the deployment, so check the panel in the exact place students will be working rather than assuming this list.
The exact supports and labels available depend on the current view, loaded modules, browser, and deployment. Turn on Help Mode or press the question-mark key to inspect supported controls. Do not promise a feature to students until you test it in the delivered resource.
Text and display
Text Settings can provide controls such as text size, spacing, font, reading theme, or color support. Some views or exports may also offer light, dark, sepia, warm, cool, or high-contrast themes, a reading ruler, line focus, or reduced-animation options.
Use these controls to increase perceptibility, but remember:
- Large text must reflow without hiding controls or forcing two-direction scrolling.
- High contrast must preserve meaning, focus indicators, borders, and disabled states.
- A dyslexia-friendly or hyperlegible font may help some students and distract others.
- Reduced motion should remove nonessential animation without removing information.
- Color choices must work for students who do not perceive color in the same way.
Never encode “correct,” “group,” “urgent,” or “selected” through color alone. Add a label, symbol, pattern, or position that carries the same meaning.
Read-aloud and reading supports
Depending on the view, read-aloud may appear as Read This Page, Read Aloud, or an Immersive Reader-style experience. Voice Settings may allow voice, speed, and volume changes. Some resources may also offer highlighting, focus reading, a reading ruler, word or picture support, syllable cues, or other reading tools.
Before assigning:
- Listen to names, symbols, abbreviations, equations, and subject vocabulary.
- Confirm that reading follows a logical order.
- Check whether headings, lists, tables, and answer choices are announced clearly.
- Make sure play, pause, next, previous, stop, and close are reachable without a mouse.
- Provide the text itself; audio should not be the only route to important information.
- Tell students whether headphones are available and what to do if audio fails.
Synthetic speech can mispronounce words or flatten important expression. For fluency, poetry, world languages, music, or content where pronunciation is part of the goal, provide a teacher-reviewed model.
Visuals and organizers
Visual supports, concept maps, sequences, timelines, diagrams, and organizers can make relationships visible. They can also create barriers when labels are tiny, reading order is unclear, or the same idea is available only in the image.
For each meaningful visual:
- Write a concise text alternative that communicates its instructional purpose.
- Label important parts directly when possible.
- Use sufficient contrast and readable text size.
- Avoid dense decorative backgrounds.
- Provide the same essential relationship in text or a structured table.
- Check that zoom does not make labels overlap or disappear.
Mark purely decorative images as decorative in formats that support that distinction. Do not ask AI to invent a scientific, mathematical, historical, or safety-critical diagram without checking every element.
Vocabulary, language, and translation
A glossary, contextual definition, bilingual support, or translation can open access to the core idea. Review translations for subject meaning, tone, regional usage, names, and false cognates. Preserve key disciplinary terms when students are expected to learn them, and pair them with an explanation rather than replacing them everywhere.
Do not use home language as a public group label. Ask students and families about useful language supports through approved school practices, and treat language proficiency as developing, not as a measure of intelligence.
Annotation and organization
When available, the Annotation Suite may support highlights, notes, stickers, or voice notes on a resource. Use annotation for a defined cognitive job:
- Mark evidence for a claim.
- Label a confusing point.
- Add a question.
- Identify a pattern.
- Record a brief reflection.
Teach one annotation convention at a time. Too many colors or stickers can increase visual and executive-function load. Confirm that an annotation can be created, found, edited, removed, and saved with keyboard or alternative input. Provide a text-based alternative when drag-and-drop or freehand placement is not usable.
Voice, microphone, and alternative input
Voice Access, dictation, audio responses, and microphone-based activities can support students who prefer or require speech input. AAC or symbol-supported options may be available in some learning tools.
Before using them:
- Request only the permissions the activity needs.
- Test in the actual browser and school device.
- Explain when recording starts and stops.
- Provide a typing, selection, partner-assisted, switch, or paper route.
- Consider speech differences, background noise, privacy, and students who do not speak.
- Verify what is saved, transmitted, or shared in that deployment.
Speech recognition errors are access failures, not student errors. Do not lower a grade because recognition software misheard an answer.
Create accessible student materials
Structure text and documents
Whether the final format is a webpage, shared link, word-processing file, PDF, or printout:
- Use one descriptive title.
- Organize sections with real headings in a logical hierarchy.
- Use list formatting for lists rather than typed dashes or manual numbering.
- Write descriptive link text that makes sense out of context.
- Identify document language and language changes when the format permits.
- Keep paragraphs reasonably short and left aligned for extended reading.
- Use real columns and tables rather than spaces or repeated tabs.
- Put directions before the control, blank, or response area they describe.
A document that looks organized can still be structurally inaccessible. Visual inspection is only one part of review.
What the exported handout already carries
The HTML handout can carry an accessibility toolbar with adjustable text size, offline font choices, reading themes, and supported annotations. Verify reflow, font coverage, annotation persistence, and offline behavior in the exported file rather than assuming the preview guarantees them. Print styles are designed for a light page, but preview the actual print job. Details are in Documents and printing.
Voice features announce their state
For students and staff using hands-free features, the microphone indicator names its state in text (Listening, Paused, Thinking, Speaking), not color alone, every change is announced to screen readers, and a small level meter confirms the microphone hears you. See AlloBot.
Use tables carefully
Use a table for data relationships, not page layout. Give it a descriptive introduction, identify header rows and columns in formats that support them, keep the structure simple, and avoid merged cells when possible. Check that the table is understandable when read one cell at a time.
For a complex table, provide a summary or another representation. On small screens, confirm that students can reach every cell without losing row or column context.
Write useful alternatives for images
Alt text should communicate what the image contributes to the task, not list every visible detail. For example:
- Weak: “Image of a graph.”
- Useful: “Line graph showing temperature rising from 10 to 28 degrees as time increases from 0 to 6 minutes, then leveling off.”
If students must analyze the image independently, do not put the answer in the alt text. Describe the data and relationships they need to perceive while preserving the reasoning task.
Make audio and video usable
Provide accurate captions for speech and meaningful sounds, and a transcript when students may need a text route or search. Describe important visual information that is not evident from the audio. Avoid autoplay, provide playback controls, and check that keyboard focus does not become trapped in the player.
Review automated captions for names, vocabulary, punctuation, speaker changes, and timing. Generated captions are a draft.
Make interactions understandable
Every interactive activity should have:
- A visible label and clear instructions.
- A keyboard-operable route.
- A focus indicator.
- A way to correct or undo an accidental action when practical.
- Error messages that explain how to recover.
- Enough time, or an untimed route, unless timing is part of the learning target.
- A non-drag alternative for sorting, drawing, or spatial tasks.
- A stable fallback that captures the same evidence.
Do not use a game score, speed, streak, or animation as the only evidence of learning.
Handle mathematics, science, and symbols
Check equations, units, superscripts, subscripts, chemical notation, charts, and diagrams in the final delivery format. Confirm that assistive technology announces them meaningfully and that a plain-text explanation or alternate notation is available when needed.
Do not replace formal notation when the notation is itself part of the goal. Teach students how to move between the formal representation and an accessible verbal description.
Plan supports for common barriers
Reading and decoding load
Keep the designated primary source available when required by the learning target, standard, student plan, assessment conditions, or local policy. Offer read-aloud, clarified layout, chunking, vocabulary, and a supplemental version that preserves essential content and cognitive demand. If decoding or fluency is being assessed, separate access support for directions from the text students must read independently. Treat AlloFlow's role labels and warnings as planning safeguards, not legal or eligibility determinations.
Executive-function load
Provide a visible goal, numbered steps, estimated work segments, a model, a checklist, and a clear finish state. Use timers as optional planning aids, not public pressure. Let students resume work after interruption.
Attention and sensory load
Reduce nonessential animation, sound, notifications, decorative movement, and crowded side panels. Offer a focus view or quieter route. Do not assume a visually playful tool is motivating for every student.
Visual access
Support zoom and reflow, meaningful text alternatives, sufficient contrast, keyboard navigation, and screen-reader structure. Avoid directions such as “click the green item on the right.” Check the lesson without images to learn what meaning disappears.
Hearing access
Caption video, transcribe audio, and make alerts visible as well as audible. Give discussion questions in text. For live oral directions, provide a written version and face the class when speaking.
Motor and speech access
Avoid requiring precise dragging, rapid clicking, long handwriting, or speech as the only route. Provide selection, keyboard, switch-compatible, typed, partner-assisted, or teacher-recorded alternatives consistent with the student's plan.
Language and communication access
Use models, visuals, bilingual resources, wait time, sentence frames, symbols, AAC, and multiple response modes as appropriate. Do not force public speaking as the only demonstration unless speaking is the target.
Test the actual student experience
Complete a keyboard-only pass
Set the mouse aside and:
- Use Tab and Shift+Tab to move through controls.
- Confirm focus is always visible.
- Use Enter or Space to activate controls as expected.
- Check radio buttons, checkboxes, lists, dialogs, media, and interactive items.
- Press Escape to close dialogs where that behavior is offered.
- Confirm focus returns to a sensible place after closing.
- Check that no content or control is unreachable.
Keyboard testing does not replace switch or screen-reader testing, but it catches many serious barriers.
Check zoom, reflow, contrast, and motion
Zoom the browser substantially and use a narrow window similar to a student device. Confirm text does not overlap, clip, or disappear and that controls remain reachable. Test the available themes, operating-system contrast settings when relevant, and reduced-motion preferences.
Do not judge contrast by eye alone for important materials. Use an approved checker or accessibility audit, then manually verify focus, states, charts, images, and meaning.
Check with assistive technology
When the lesson will be used by a student who relies on a screen reader, speech input, magnification, switch access, AAC, captions, or another assistive technology, test with that technology and involve the student or appropriate specialist. A simulation or automated scanner cannot reproduce the student's full experience.
Do not change a student's established accommodations because another digital option appears convenient. Coordinate with the student's plan and support team.
Preview the delivered copy
Accessibility in the teacher workspace does not guarantee accessibility in an export, QR-linked assignment, embedded page, live activity, or printed copy. Test the final route:
- Open the exact student link.
- Download and reopen the actual file.
- Join the actual session type.
- Use the final device size and browser.
- Confirm the fallback is easy to find.
Repeat the relevant checks after changes.
Use automated accessibility tools responsibly
An Accessibility Lab, PDF accessibility workflow, contrast checker, or document audit can help find issues and suggest remediation. Automated results are valuable triage, but they cannot determine whether:
- Alt text conveys the right instructional meaning.
- Heading structure matches the ideas.
- Reading order makes sense.
- link text is useful in context.
- Captions are accurate.
- A cognitive load is reasonable.
- An interaction works with a student's technology.
- The alternative preserves the learning goal.
Review every automated fix. A change that improves a score can still damage content or usability.
Protect dignity and privacy
Accessibility information can be sensitive. Do not paste an individualized education program, accommodation plan, evaluation, medical record, behavior note, or named student profile into a general generation prompt. Describe the design requirement without identifying the learner.
Offer supports in a way that does not announce who “needs” them. Normalize the use of tools, allow private choice or routing when possible, and avoid recording support choices as deficit data. Follow Privacy and responsible AI and local policy.
Student-experience conversation
Ask students directly, in an accessible and nonjudgmental way:
- Could you tell what to do first?
- What helped you understand the source?
- What got in the way?
- Could you use the response method you needed?
- Did any tool call unwanted attention to you?
- Was there a point where you could not recover on your own?
- What should stay the same next time?
Student feedback is evidence about the design, not a demand that the student justify an accommodation.
Accessibility review checklist
Goal and design:
- The essential learning goal is clear, and flexible methods do not erase it.
- Barriers were described in the task or environment, not as student deficits.
- The default route is understandable without optional tools.
- Choices are purposeful, limited, and named by function.
Content:
- Headings, lists, links, tables, language, and reading order are structured.
- Images, diagrams, equations, audio, and video have usable alternatives.
- Facts, captions, translations, pronunciations, and alt text were reviewed.
- Color, position, sound, or motion is not the only carrier of meaning.
Interaction:
- The lesson works with keyboard navigation and visible focus.
- Zoom, narrow-screen reflow, themes, and reduced motion were checked.
- Timed, spoken, dragged, drawn, or microphone-based tasks have an appropriate alternative.
- Errors explain recovery, and students can save or resume as needed.
Delivery:
- The exact student link, export, printout, or live route was tested.
- Needed assistive technology was tested with the student or specialist when appropriate.
- An accessible fallback is easy to reach.
- Student dignity, privacy, and existing accommodation plans are protected.
For delivery planning, return to Prepare a lesson or continue to Live sessions. For reusable classroom patterns, see Classroom workflows.